
The screenshots show the interface used for this guide. Labels and available features may differ in your version.
1. Use @ to refer to an earlier chat
Type @ in the message box and look under Session conversations. Choose the relevant chat, then name the material you want to reuse.
For example: “Use the action list in @Project review to draft this week's status update. Keep the original owners and due dates, and flag missing information.”
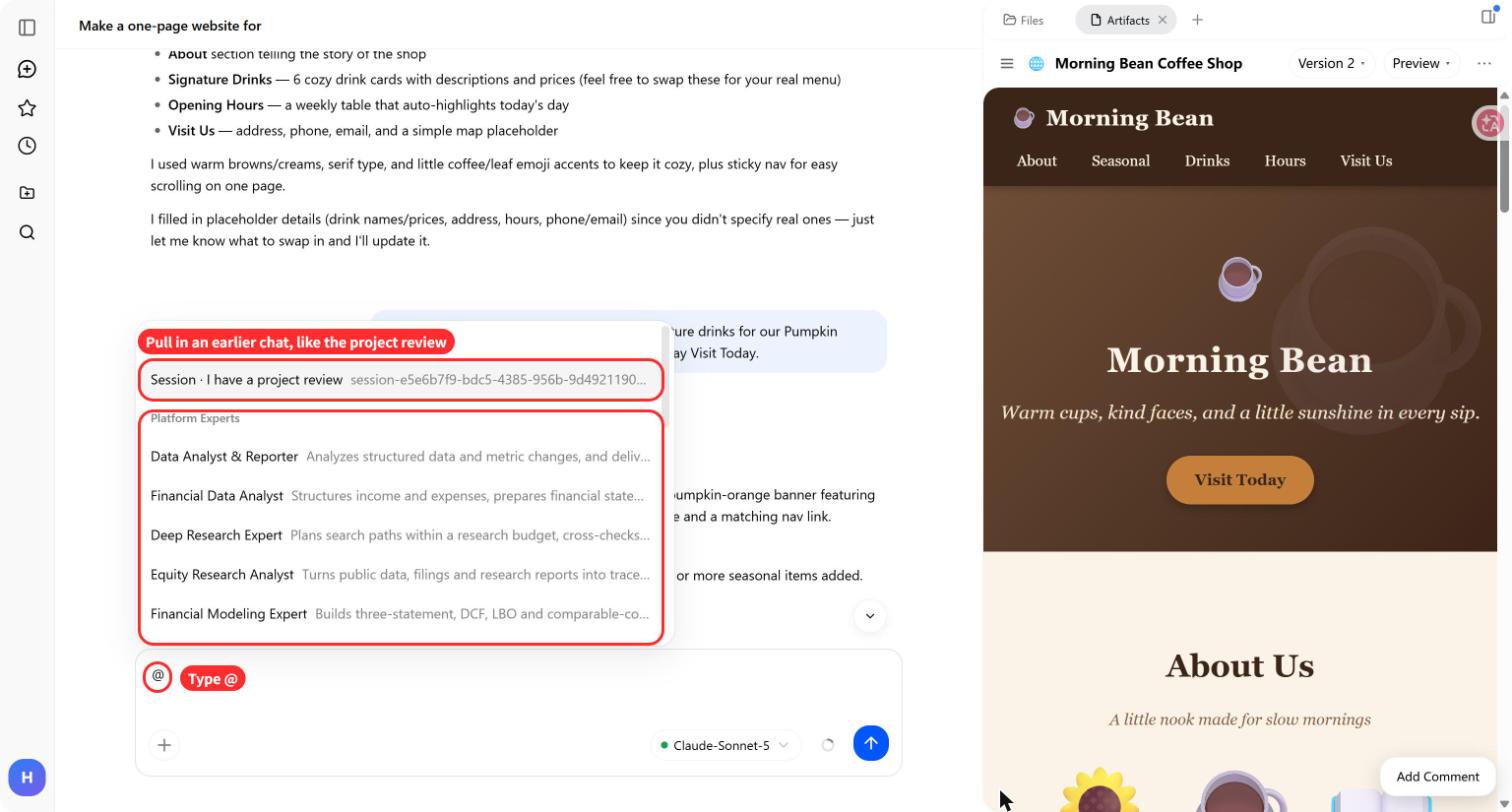
A reference helps locate earlier work; it doesn't guarantee that the full conversation carries over. Point to a particular file, decision, or section. Check that the draft uses the right one before continuing.
2. Start a separate task while another runs
Click New task to begin another job while the existing task continues. The screenshot shows a website task open while a separate document task is still running in the sidebar.
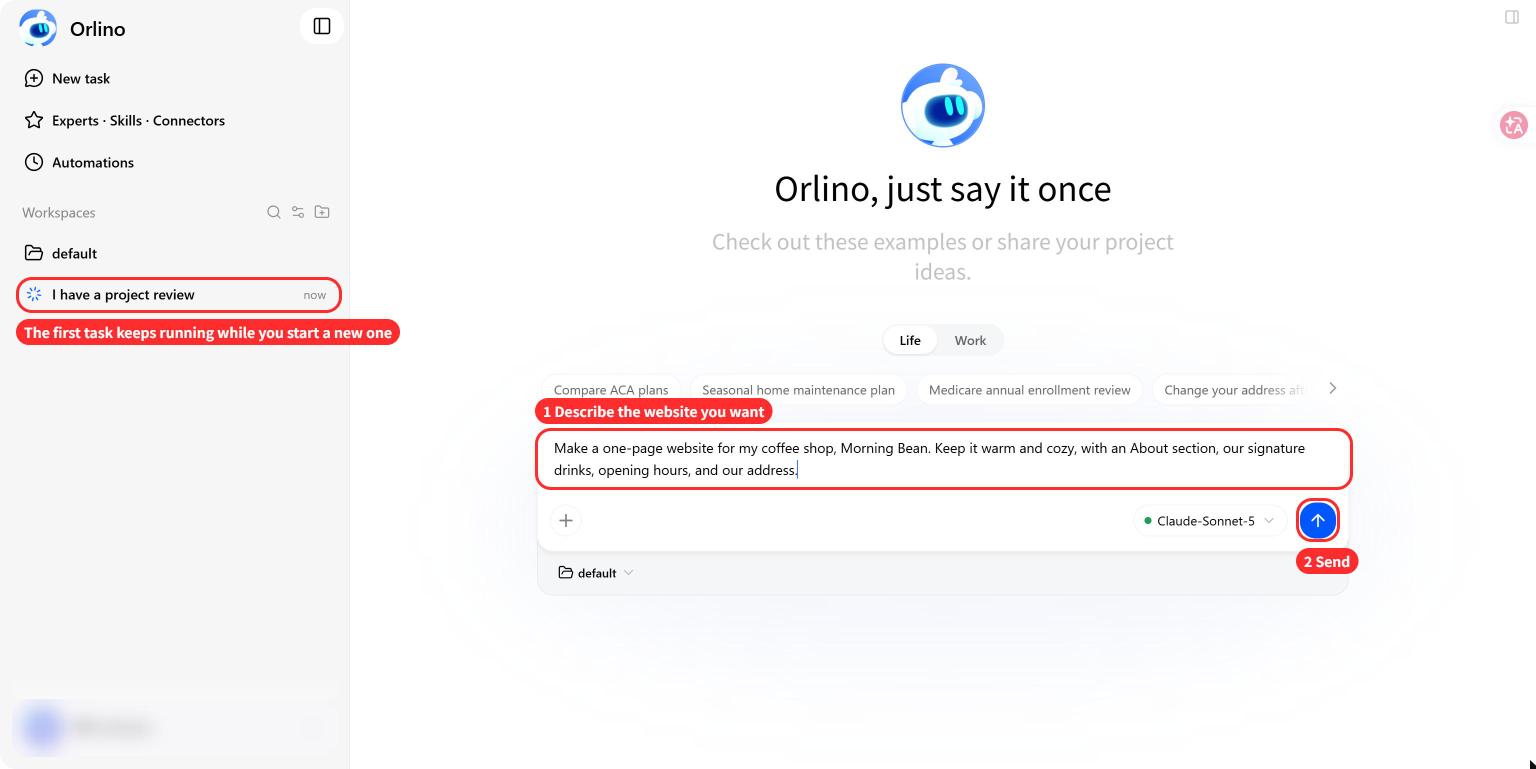
This works well for independent jobs, such as drafting meeting notes and revising a website headline. Give each task its own brief and check the results separately.
If the second task needs the first task's output, wait for that file. Running both at once won't resolve a missing input.
3. Pick up saved files from another chat
Open the Files panel to find files stored in the same workspace, including output from other chats. The @file control beside a folder lets you reference it in your message.
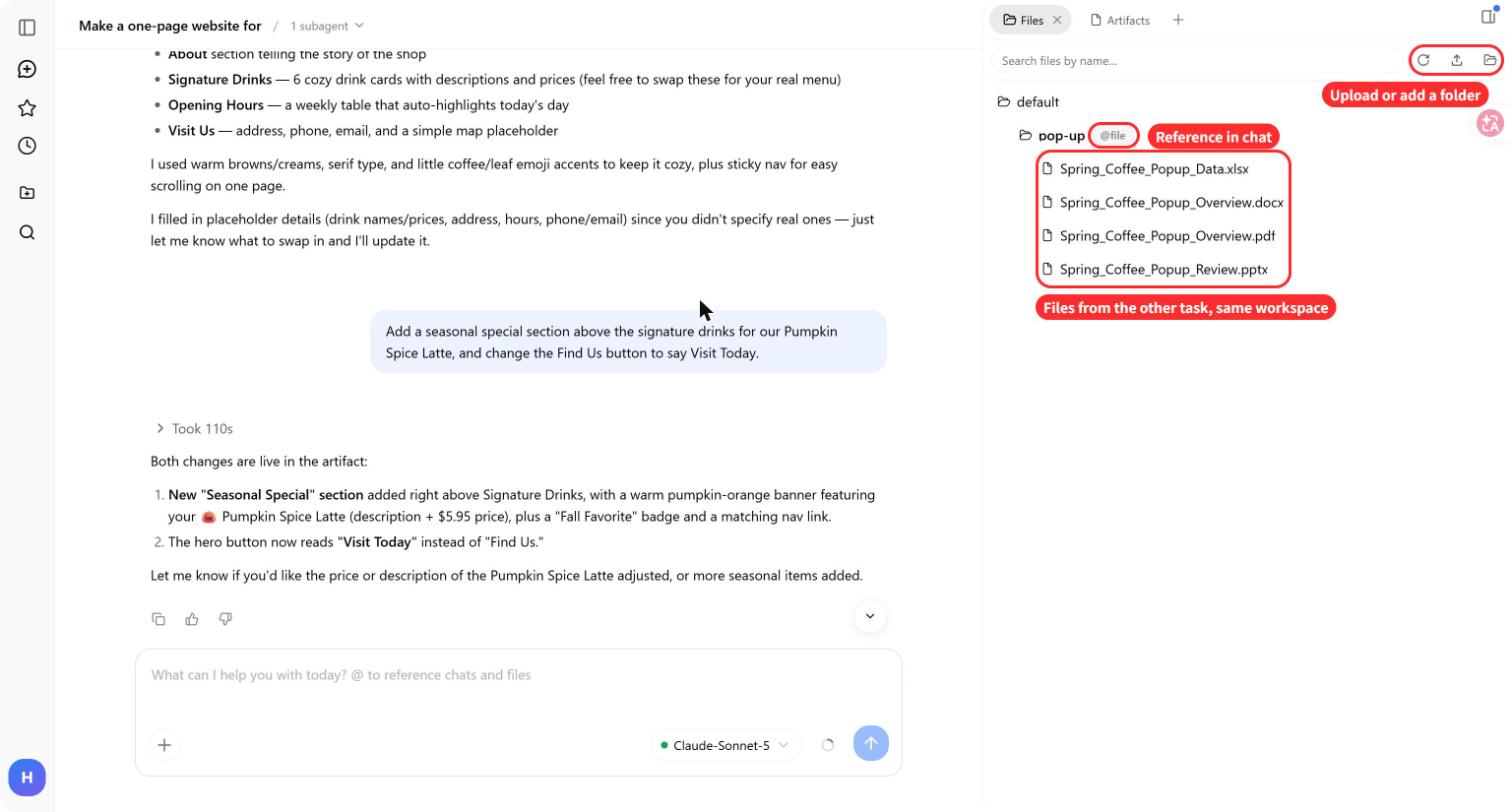
When you start a fresh chat in that workspace, reference the saved files and add a short brief with the goal and any decisions that still matter. Keeping a file available and carrying over a conversation are separate things.
“Use the attached report to draft a one-page update. Keep the approved budget and launch date unchanged” is more useful than “Continue where we left off.”
4. Point to the part of a webpage you want changed
In the website preview, click Add Comment, then select the part of the page you want to edit. Orlino quotes the selection and asks how it should change. Write your instruction and keep Send to Orlino checked.
Be specific: “Change this button's label to ‘See the menu.’ Keep its size and position.”
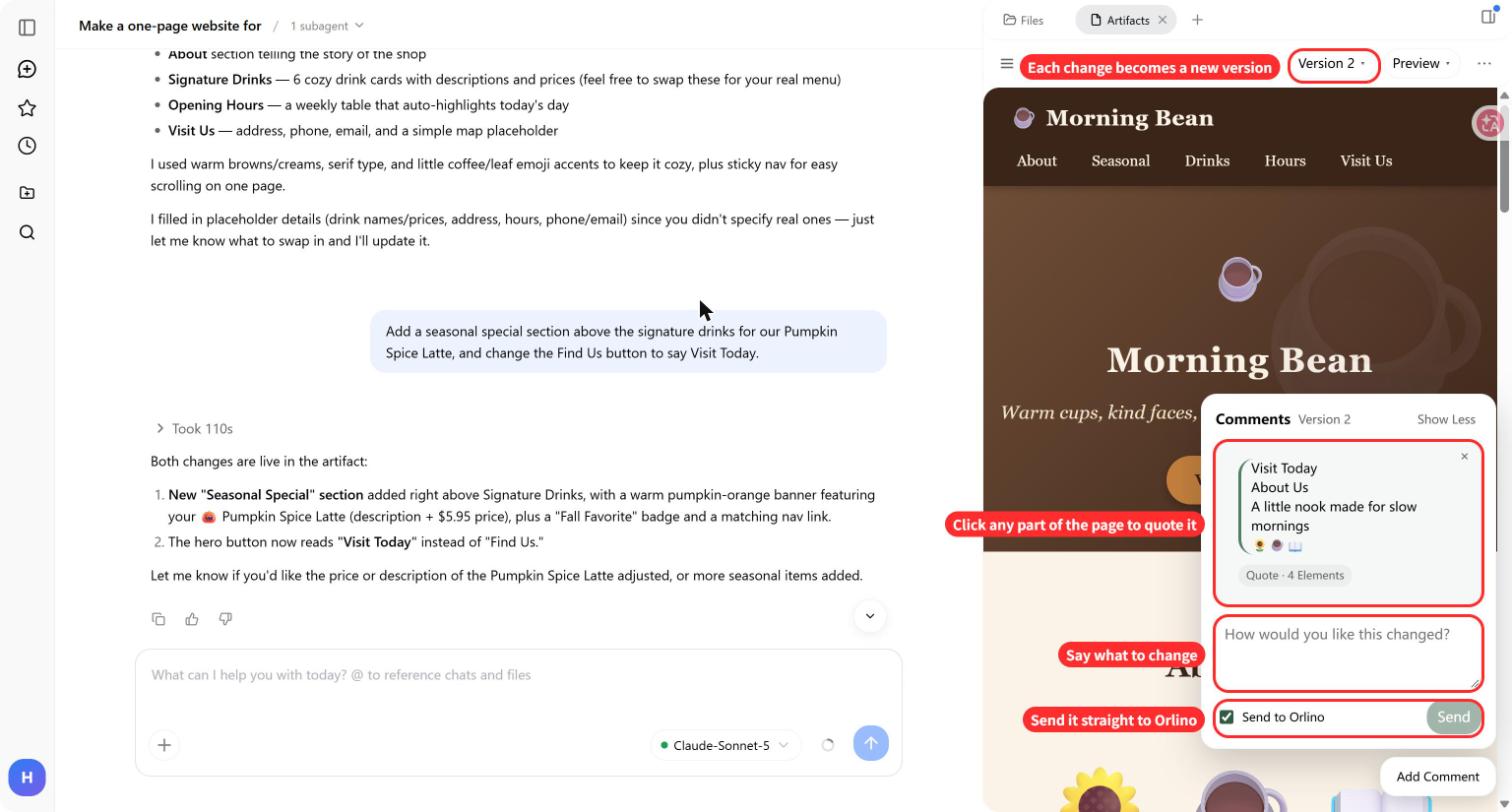
After the edit, check the text and the surrounding layout. The version menu lets you view earlier versions for comparison.
5. Choose Queue for later or Steer for the current task
Open Settings → General and find Enter behavior while busy. It controls how a message is handled when Orlino is already working:
- Queue saves the message for later. Use it for a follow-up such as “After the report, draft a short email introducing it.”
- Steer sends guidance to the current run. Use it to correct the brief: “Use the revised forecast file for the chart.”
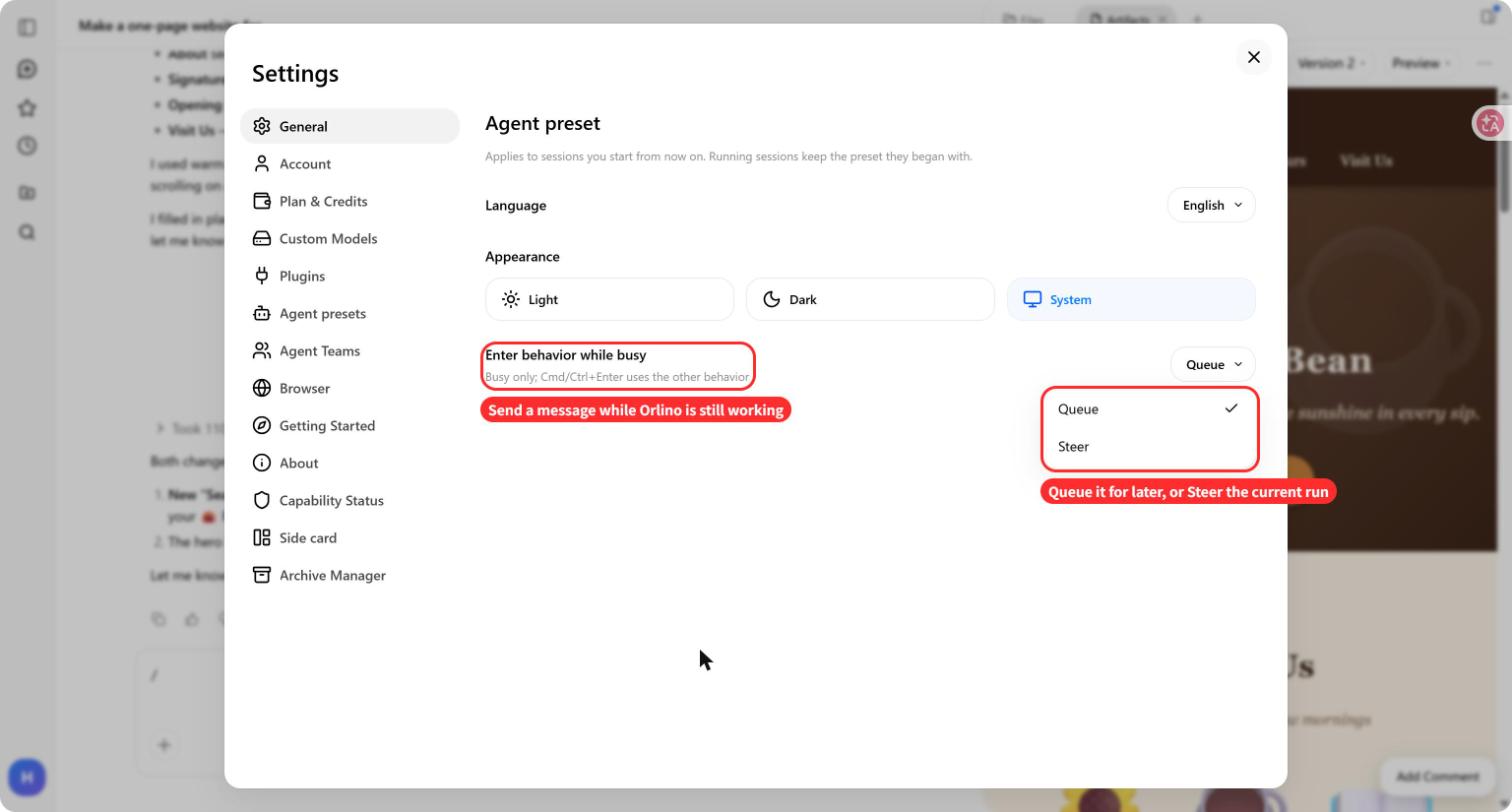
The interface shown also supports Cmd/Ctrl + Enter to use the other behavior for that message.
6. Add a file, expert, or skill without restarting
The + button beside the message box opens Add Files, Experts, Skills, and Connectors. You can add what the task needs from the current chat.
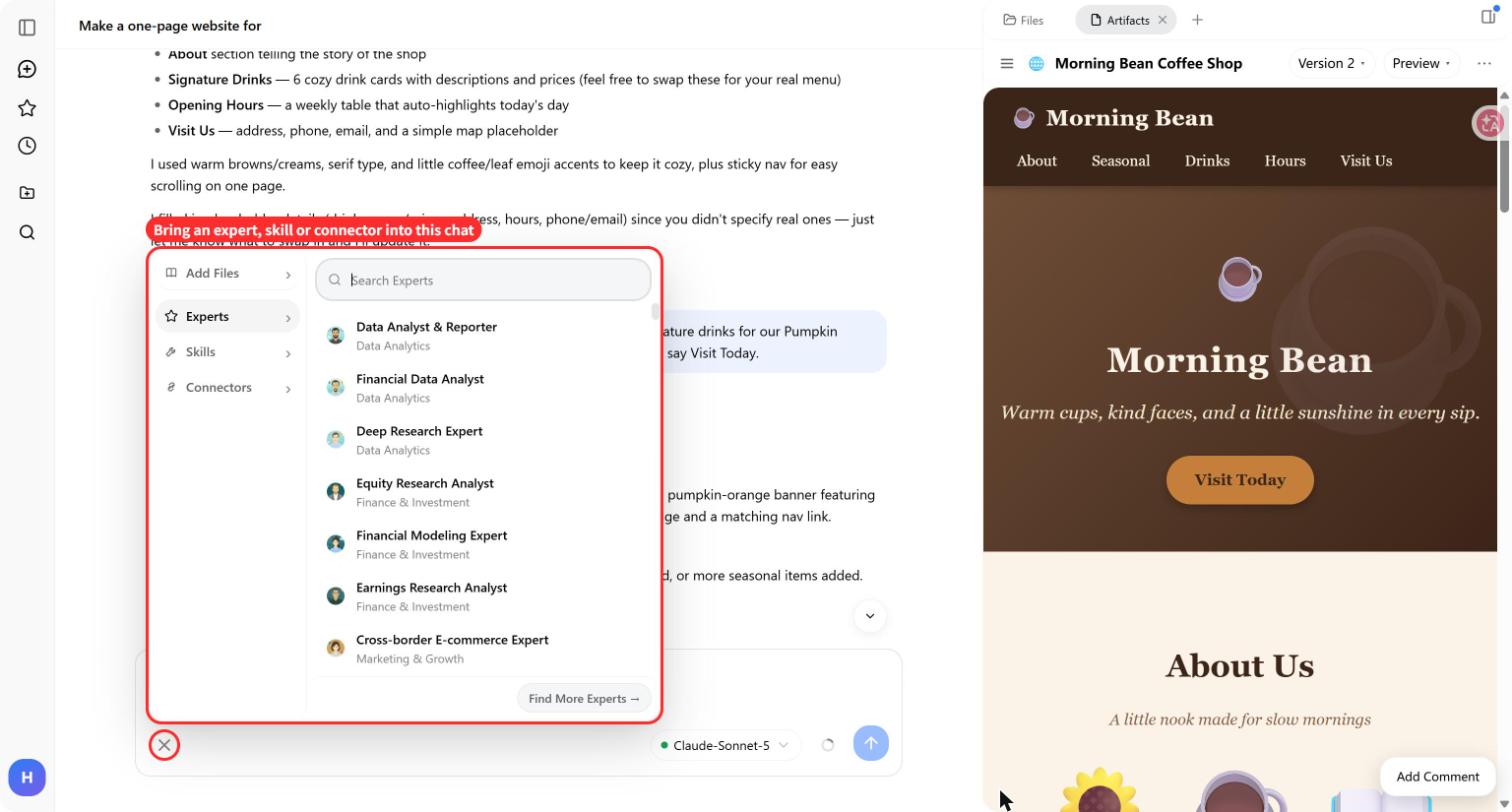
Read an expert's or skill's description before selecting it, then explain the job. For a spreadsheet review, specify which sheet to inspect and whether you want a summary or proposed changes.
Connectors may require you to connect an account and grant supported permissions. Check availability before building a task around a particular service.
7. Choose the browser for a research task
In Settings → Browser, the interface shown offers a built-in browser, an external browser option, and a default browser setting. The external Chrome option requires an extension.
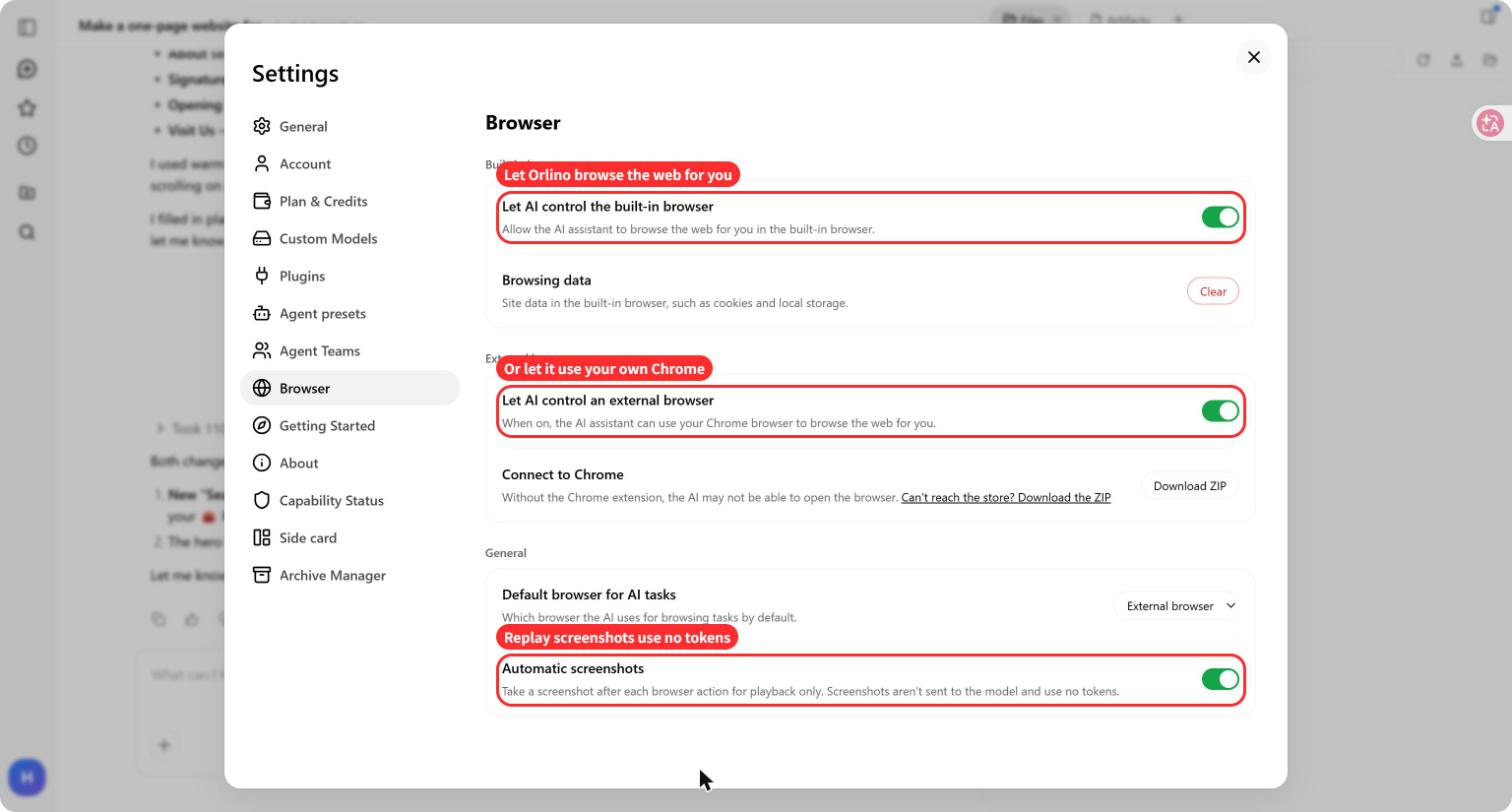
When asking for research, name the sources or questions and request links alongside the findings. Open those links to check that they support the answer.
Automatic screenshots is a separate setting for playback captures. Its description says these captures aren't sent to the model and don't consume tokens. That note applies to the playback captures, not to all work performed during a browser task.
8. Check context usage when a chat gets long
Click the small circle beside Send to inspect context usage. The screenshot shows 15%, approximately 38.4K / 262K tokens, with a breakdown for the system prompt, tools, and messages.
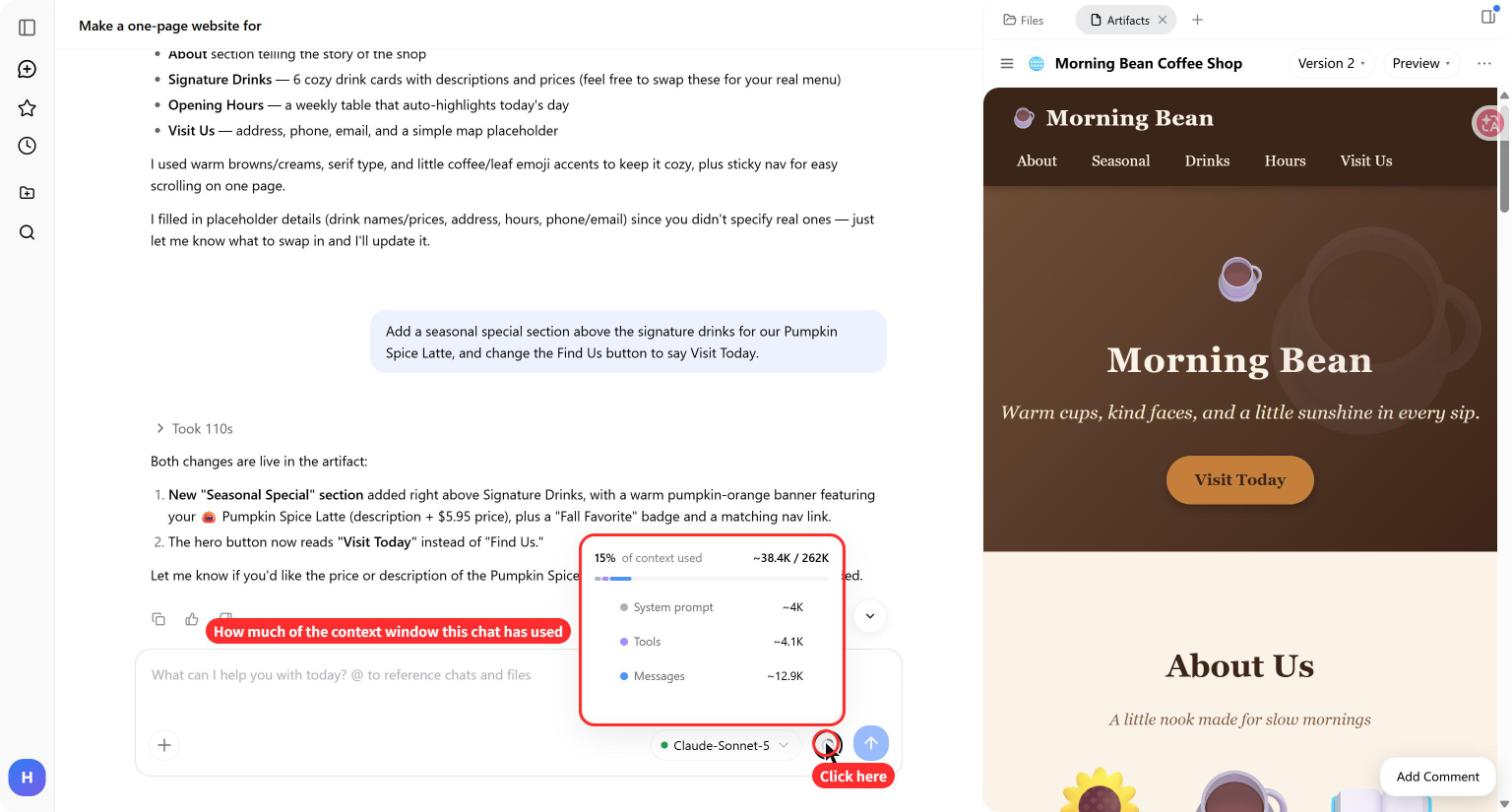
Don't treat the percentage alone as a reason to restart. Consider a fresh chat when the topic changes or the conversation repeatedly loses track of requirements.
First ask for a handover summary with the current goal, decisions, file names, and unfinished work. Review it, then use it to brief the new chat.
9. Check context capacity before switching models
You can choose a different model in Orlino for a task. The capacity difference matters most in long chats: a model with a smaller context window may not fit as much of the earlier material.
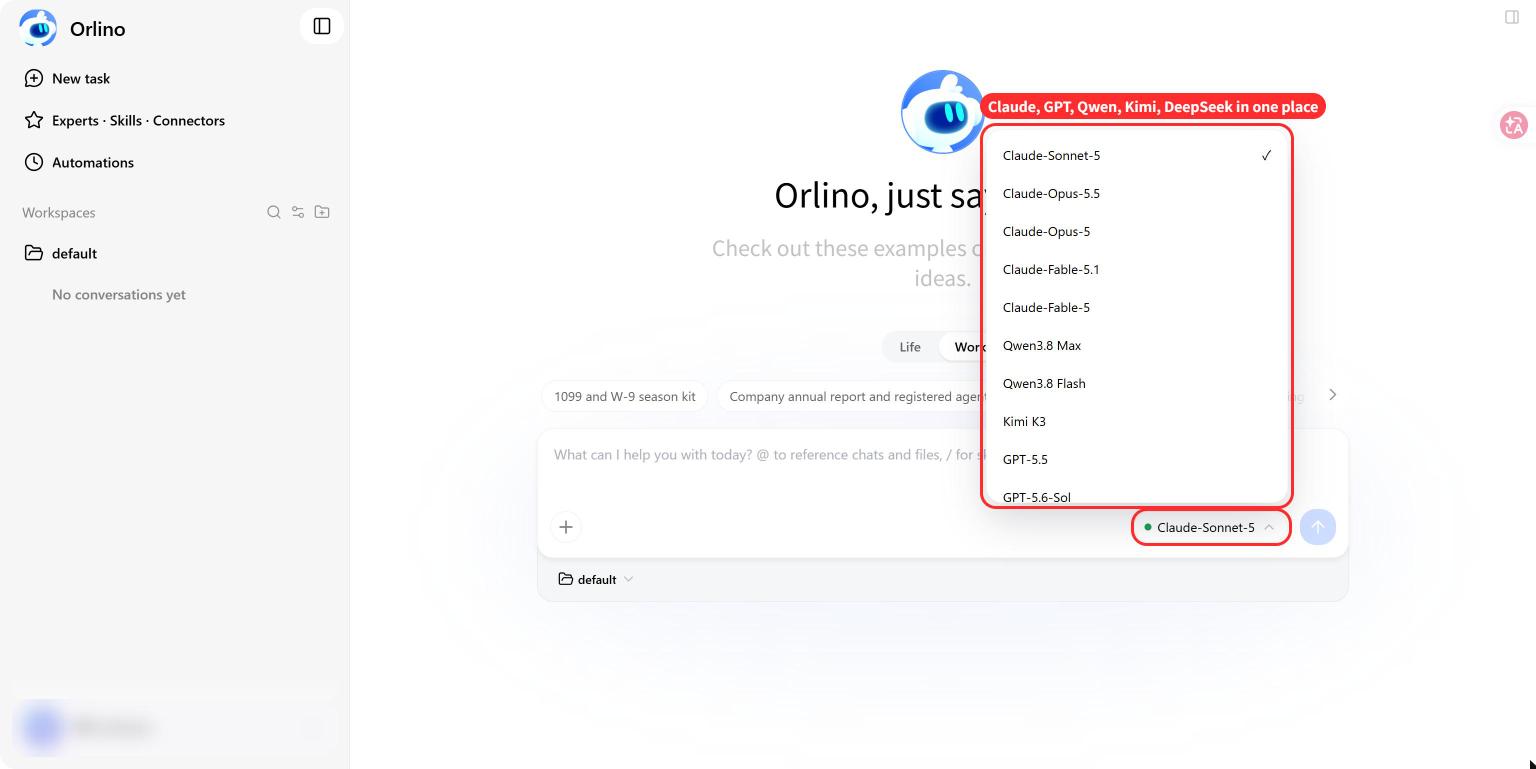
Before switching, keep a concise brief of the requirements and reference the source files that matter. If you're comparing models, use the same brief and files in separate chats, then compare the results against the same criteria. For a report, those might be correct totals, preserved dates, and clear explanations.
10. Connect your own API key
Open Settings → Custom Models to configure your own API key. Choose a listed provider or a custom endpoint and complete the connection fields. A valid key alone isn't enough: the endpoint and model also need to be compatible with the connection.
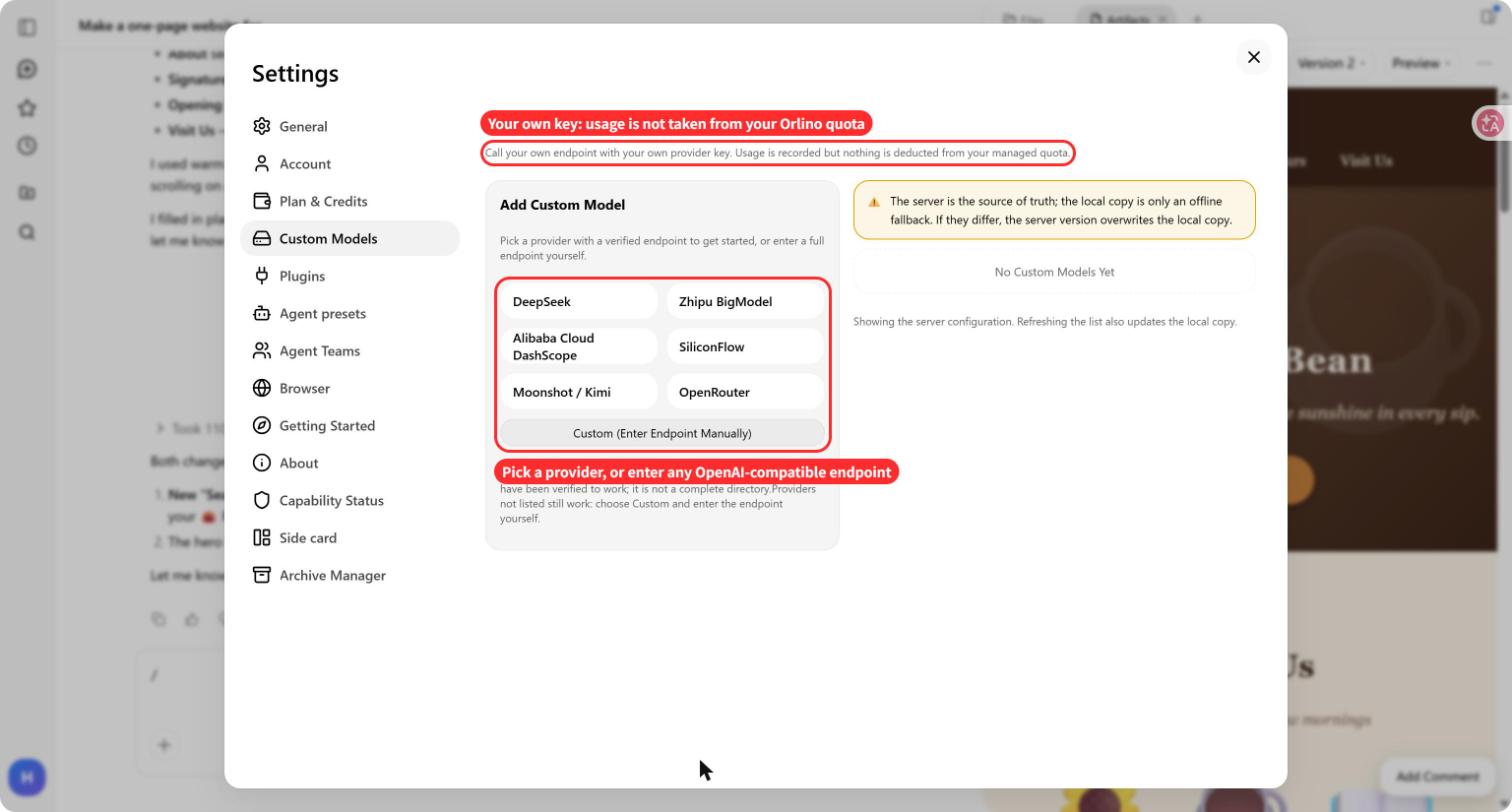
The settings screen says usage through your own key is recorded without being deducted from your Orlino managed quota. Your API provider can still charge for that usage under its own terms. Check the provider's billing settings and try a small request before using the connection for a larger task.
Open Orlino and try @ on a chat you want to pick up again.
About this article
Published by Orlino. The screenshots show the interface used for this guide. Feature labels and availability can vary by app version. See our editorial process.
Keep reading
Turn Project Notes into Word, Excel, PowerPoint and PDF
Turn project notes into Word, Excel, PowerPoint and PDF with Orlino. Follow a sample run, copy the prompt and check the files before sharing.
Read article Task guidesStart with a task you already have
Find prompts and worked examples for reports, spreadsheets, and everyday planning.
Explore guides